EVA Mobile Check-In App Set Up Guide
Prerequisite
Salesforce Instance
EVA Salesforce-Native Event Registration App (https://appexchange.salesforce.com/appxListingDetail?listingId=a0N4V00000K3BZlUAN)
Zebra Printer (Model ZD620, ZD621) with Wifi feature.
Power cable
Network cable
iPad with iPadOS 12.4 or later.
WiFi router with SIM or venue hardline
Power cable
Badge Stock
Installing App on iPad
Download the “EVACheckIn” app from Apple app Store using the below url:
https://apps.apple.com/us/app/evacheckin/id6463192914
App Login Credentials
You will be provided the client admin login credentials for login into the app by admin. (To create the client admin user credentials, one needs to create a connected app in the salesforce and configure it with EVA CheckIn WebApp to sync the events and attendees information with CheckIn App).
Further, client admin can create more users for login into the app.
Connecting Printer with iPad
After you login into the app, you will need to set up the printer with the app.
There are two ways to set up the Zebra printer with the iPad.
Connect Printer using IP Address
Turn ON the printer and connect with Network
Connect the Power cable with the printer and press the Power button for about 5 seconds and then release the power button.
Connect a network cable to the rear of the tag printer.
Connect the other end of the network cable into an available port on your router.
Turn ON WIFI on your iPad
From your Home screen, go to Settings > Wi-Fi.
Turn on Wi-Fi. Your device will automatically search for available Wi-Fi networks.
Tap the name of the Wi-Fi network that you want to join. (Make sure your iPad and Printer are connected to the same wifi network).
Grab the IP Address
Method 1
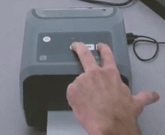
Press and hold the Feed button and Cancel button until printing begins. It will print the Network Configuration. You can grab the IP address from the wired section.

Open the app on iPad and login. After login goto printer setup menu and enter the IP address.
Open the EVA CheckIn App
Login with your credentials
Click on the Hamburger menu
Choose the Printer Settings Menu.
Choose “Connect via IP”
Enter the IP Address of the Printer.

Method 2
You can use the Zebra Printer Setup Utility App. Click the url below to download the app.
https://apps.apple.com/us/app/zebra-printer-setup-utility/id1454308745
Open the Zebra Setup Utilities App.
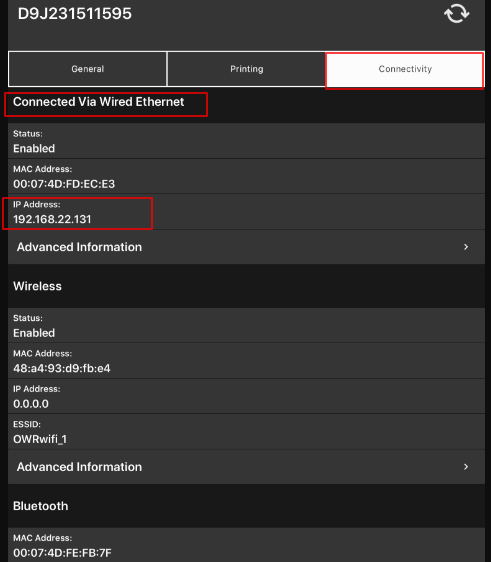
Navigate to the printer setup menu below, and select Connectivity Settings.
On the next screen, see the ip address in the section “Connect Via Wired Ethernet”
Connect Printer using Bluetooth
Turn ON Bluetooth in iPad
From your Home screen, go to Settings > Bluetooth > ON
Detect Printer on app
Open the EVA CheckIn App
Login with your credentials
Click on the Hamburger menu
Choose the Printer Settings Menu.
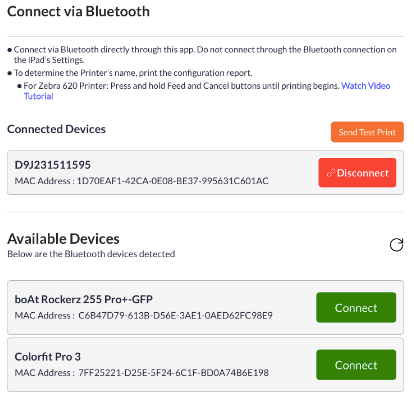
Choose “Connect via Bluetooth”
Search for the available devices
Identify and connect your printer
Load the Badge Stock
Insert your stock through the slot at the rear of the printer, feeding the edge with the black line into the printer slot first.
The timing mark is read through a sensor on the bottom of your printer, so the timing mark must be face-down with the blank or branded stock face-up. Expand the media guide's hangers so that they're the width of the badge stock. Then run the badge stock through between and underneath the media guide's hangers. Then close the printer.

Calibrating the Printer
The printer will be in pause mode. Press the Pause indicator button on the front of the printer to exit pause mode.
Calibrate your printer by pressing and holding the Pause and Cancel buttons for 2 seconds.
Related Articles
Managing Your Event: How to Check In Attendees
1. From your dashboard, select the "Events" tab at the top of the screen 2. Select the name of your event 3. Select the button labeled Manage Event 4. Click the gray tab labeled Check in Attendees 5. From here you will be able to see all of your ...EVA Event Tech Hub Salesforce App Installation Guide
Installation Guide To Install the EVA Event Registration App from the Salesforce App Exchange, follow the below steps. Search the App in AppExchange Either search for the “EVA Event Registration” on AppExchange. Or you can directly access the app ...Matchmaking: how to set your availability
1. Access the event platform using the link or URL provided by the event organizer 2. At the top of the page, click the Login button 3. Login using the credentials you used to register for the event 4. Hover your mouse over your profile picture in ...Site Settings: A Guide to Site Settings
What are Site Settings? Site settings are settings that will affect every page of the event tech hub and includes fundamental webpage settings such as engagement features, sessions, registration, and accessing the hub. 1. To make edits to the event ...Which Web Browser Should I Use? Device Compatibility for EVA's Event Platform and Video Conferencing
What does Compatibility Mean? In technology, compatibility usually refers to how well a device (such as a phone or computer) works with a piece of software (like a game, website, or app). Two pieces of technology that are "compatible" mean you can ...